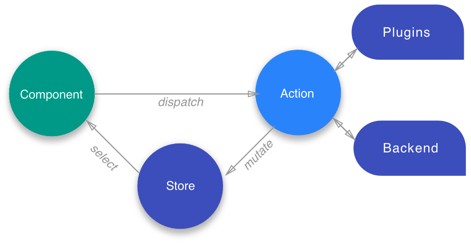
ngxs is a library for state management built designed on how angular works and seeks to solve the same problem of redux. In the ngxs is built-in libraries that help us to manage the application states. You can say that ngxs are the built-in libraries’ pattern of state management.
The benefits of ngxs
- It have switch statements.
- It is more similar to Angular style
- Dependency Injection
- The problem of Boilerplate.
- Effects can be painful.
- We listen for the dispatched actions
- We extend in abundance
The four principles
- STORE
- ACTIONS
- STATE
- SELECTS

Using the Store
To dispatch actions, you must inject the Store and invoke the dispatch.
import { Store } from '@ngxs/store';
import { AddAnimal } from './animal.actions';

@Component({ ... })
export class ZooComponent {
  constructor(private store: Store) {}

  addAnimal(name) {
    this.store.dispatch(new AddAnimal(name));
  }
}
You can subscribe to the dispatch and react accordingly.
import { Store } from '@ngxs/store';
import { AddAnimal } from './animal.actions';

@Component({ ... })
export class ZooComponent {
  constructor(private store: Store) {}

  addAnimal(name) {
    this.store.dispatch(new AddAnimal(name)).subscribe(() => this.form.reset());
  }
}
You can get a snapshot of the state by simply calling store.snapshot()
Using the actions
If we want to update the states we must-do actions. An example would be like this:
export class FeedAnimals {
  static readonly type = '[Zoo] Feed Animals';
}
Using the states
To have control of the states in our app we create classes that represent the models and through actions we update them.
import { State } from '@ngxs/store';

@State<string[]>({
  name: 'animals',
  defaults: []
})
export class AnimalsState {}
Using the selectors
To obtain the value of the states we use the Selector decorator
import { Select } from '@ngxs/store';
import { ZooState } from './zoo.state';
import { AddAnimal } from './animal.actions';
@Component({ ... })
export class ZooComponent {
// Reads the name of the store from the store class
@Select(ZooState) animals$: Observable<string[]>;
// Reads the name of the property minus the $
@Select() animals$: Observable<string[]>;
// Also accepts a function like our select method
@Select(state => state.animals) animals$: Observable<string[]>;
}Installation
Get the installation from npm.
npm install @ngxs/store --save

# or if you are using yarn
yarn add @ngxs/store
then in app.module.ts, import the NgxsModule:
import { NgModule } from '@angular/core';
import { NgxsModule } from '@ngxs/store';

@NgModule({
  imports: [NgxsModule.forRoot([ZooState])]
})
export class AppModule {}
Store
A global state container, stock dispatcher and selector.
Example
export interface ZebraFood {
  name: string;
  hay: number;
  carrots: number;
}
export class FeedZebra {
    static readonly type = '[Zoo] Feed Zebra';
    constructor(public zebraToFeed: ZebraFood) {}
}
Creating
An action example in animal.actions.ts
export class AddAnimal {
  static readonly type = '[Zoo] Add Animal';
  constructor(public name: string) {}
}
Actions
Classes describing the action to be taken and its payload
export interface ZebraFood {
  name: string;
  hay: number;
  carrots: number;
}
export class FeedZebra {
    static readonly type = '[Zoo] Feed Zebra';
    constructor(public zebraToFeed: ZebraFood) {}
}
Create
export class FeedAnimals {
  static readonly type = '[Zoo] Feed Animals';
}
State
State is the class definition.
@State<string[]>({
  name: 'animals',
  defaults: {
    zebraFood: []
  }
})
Actions can also pass along metadata that has to do with the action. As we want to pass along how much hay and carrot a zebra needs.
@Action(FeedZebra)
  feedZebra(ctx: StateContext<ZooStateModel>, action: FeedZebra) {
    const state = ctx.getState();
    ctx.setState({
      ...state,
      zebraFood: [
        ...state.zebraFood,
        // this is the new ZebraFood instance that we add to the state
        action.zebraToFeed,
      ]
    });
  }
Selects
The selectors to divide the states.
elects are functions that slice a specific portion of the state from the global state container. Slices of data from the store are selected by using the @Select decorator.
@Select(state => state.zoo.animals) animals$: Observable<string[]>;The store class has a select function:
export class ZooComponent {
  animals$: Observable<string[]>;

  constructor(private store: Store) {
    this.animals$ = this.store.select(state => state.zoo.animals);
  }
}
I hope this Post is useful 🙂 and if you want to read more about this most on official website: click here
visit the angular tutorial list. And make strong your angular concept. click here. wuschools.com is always written about agular concept for the angular lover. Ang writes about how angular makes your life easy if you are a web site developer.


