Angular Docker is the most popular way to create containers, which is a pared-down version of Linux with just enough functionality to run the application. Most cloud platforms or hosting engines have support for Angular Docker, and its tools run on the most popular operating systems.
Installing Docker
The first step is to download and install the Angular Docker tools on your development machine, which is available from www.docker.com/products/docker. There are versions for macOS, Windows, and Linux, and there are some specialized versions to work with the Amazon and Microsoft cloud platforms. The free Community edition is sufficient for this post.
Caution
One drawback of using Docker is that the company that produces the software has gained a reputation for making breaking changes. This may mean that the example that follows may not work as intended with later versions.
Preparing the Application
The first step is to create a configuration file for NPM that will be used to download the additional packages required by the application for use in the container. I created a file called deploy-package.json in the SportsStore folder with the content shown in the following example.
The Contents of the deploy-package.json File in the SportsStore Folder
{
 "dependencies": {
 "bootstrap": "4.1.1",
 "font-awesome": "4.7.0"
 },
 "devDependencies": {
 "json-server": "0.12.1",
 "jsonwebtoken": "8.1.1",
 "express": "^4.16.3",
 "https": "^1.0.0",
 "connect-history-api-fallback": "^1.5.0"
 },
 "scripts": {
 "start": "node server.js"
 }
}
The dependencies section omits Angular and all of the other runtime packages that were added to the package.json file when the project was created because the build process incorporates all of the JavaScript code required by the application into the files in the dist/SportsStore folder. The devDependencies section includes the tools required by the production HTTP/HTTPS server
The scripts section of the deploy-package.json file is set up so that the npm start command will start the production server, which will provide access to the application and its data.
Creating the Angular Docker Container
To define the container, I added a file called Dockerfile (with no extension) to the SportsStore folder and added the content shown in the following example.
The Contents of the Dockerfile File in the SportsStore Folder
FROM node:8.11.2
RUN mkdir -p /usr/src/sportsstore
COPY dist/SportsStore /usr/src/sportsstore/dist/SportsStore
COPY ssl /usr/src/sportsstore/ssl
COPY authMiddleware.js /usr/src/sportsstore/
COPY serverdata.json /usr/src/sportsstore/
COPY server.js /usr/src/sportsstore/server.js
COPY deploy-package.json /usr/src/sportsstore/package.json
WORKDIR /usr/src/sportsstore
RUN npm install
EXPOSE 80
CMD ["node", "server.js"]
The contents of the Dockerfile use a base image that has been configured with Node.js and copies the files required to run the application, including the bundle file containing the application and the package.json file that will be used to install the packages required to run the application in deployment.
To speed up the containerization process, I created a file called .dockerignore in the SportsStore folder with the content shown in the following. This tells Angular Docker to ignore the node_modules folder, which is not required in the container and takes a long time to process.
The Contents of the .dockerignore File in the SportsStore Folder
node_modulesRun the command shown in the following in the SportsStore folder to create an image that will contain the SportsStore application, along with all of the tools and packages it requires.
Building the Docker Image
docker build . -t sportsstore -f DockerfileAn image is a template for containers. As Docker processes the instructions in the Angular Docker file, the NPM packages will be downloaded and installed, and the configuration and code files will be copied into the image.
Running the Application
Once the image has been created, create and start a new container using the command shown in the following.
Starting the Docker Container
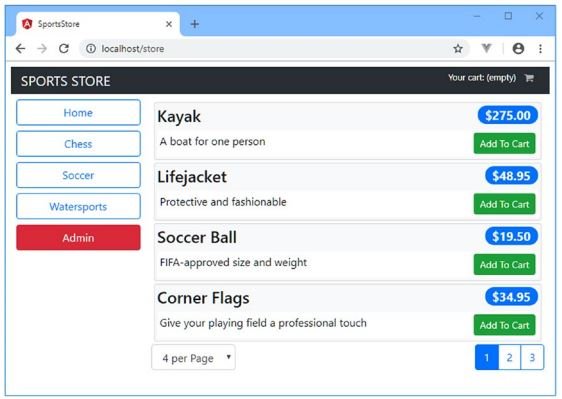
docker run -p 80:80 -p 443:443 sportsstoreYou can test the application by opening http://localhost in the browser, which will display the response provided by the webserver running in the container, as shown in the following image.

To stop the container, run the command shown in the following.
docker psYou will see a list of running containers, like this (I have omitted some fields for brevity):
CONTAINER ID IMAGE COMMAND CREATED
ecc84f7245d6 sportsstore "node server.js" 33 seconds ago
Using the value in the Container ID column, run the command shown in the following
docker stop ecc84f7245d6The application is ready to deploy to any platform that supports Docker, although the progressive features will work only if you have configured an SSL/TLS certificate for the domain to which the application is deployed.
Visit the angular tutorial list. And make strong your angular concept. click here. wuschools.com is always written about the Agular concept for the angular lover. Ang writes about how angular makes your life easy if you are a web site developer.


