PrimeNG is the open-source UI component for angular projects that are developed by PrimeTek Informatics. The PrimeNG all widgets are freely available for your angular application under the MIT license and open-source. PrimeNG is the collection of all rich User Interface components that are used in angular projects.
Why PrimeNG?
After reading this article you will be able to decide that PrimeNG is necessary for your project or not. If necessary then Why?
80+ COMPONENTS

80+ components are available for your angular projects in only a single library. You should no need to add any other library to using the different UI components. UI components like InputGroup, InputGroup, MenuModel, Breadcrumb, Drag&Drop, Charts, etc.
OPEN SOURCE

All widgets are open source hosted by GitHub. All widgets code is available and freely we can use under the MIT license.
THEMES

PrimeNG has 8 themes include the material and bootstrap design. These are the theme list:
- Nove Light
- Nove Dark
- Nove Colored
- Luna Amber
- Luna Blue
- Luna Green
- Luna Pink
- Rhea
TEMPLATES

PrimeNG provides you highly professional templates designed that are customizable native Angular CLI application templates to get you started in no time. Available template list is:
- Mirage
- Prestige
- Sapphire
- Avalon
- Serenity
- Ultima
- Barcelona
- Babylon
- Roma
- Olympia
- California
- Ecuador
- Apollo
- Manhattan
- Harmony
- Verona
- Paradise
- Morpheus
- Atlantis
- Poseidon
- Omega
ACCESSIBILITY

Fully accessible and in compliance with Section 508 standards.
PRO SUPPORT

Available Pro account with the fast support that helps you to solve your issues. You can post your question by using the issue form, your issues to the community issue tracker.
Get Started
PrimeNg is available at npm if you have already any project is under construction then run the following code for download.
npm install primeng --save
npm install primeicons --save
Import
import {AccordionModule} from 'primeng/accordion';     //accordion and accordion tab
import {MenuItem} from 'primeng/api';                 //api
Dependencies
<link rel="stylesheet" type="text/css" href="/node_modules/primeicons/primeicons.css" />
<link rel="stylesheet" type="text/css" href="/node_modules/primeng/resources/themes/nova-light/theme.css" />
<link rel="stylesheet" type="text/css" href="/node_modules/primeng/resources/primeng.min.css" />
Angular CLI Integration
Angular CLI is the official tool for the angular project. Add PrimeNG and PrimeIcons as dependencies.
"dependencies": {
  //...
  "primeng": "^8.0.0",
  "primeicons": "^2.0.0"
},
Styles Configuration
"styles": [
  "node_modules/primeicons/primeicons.css",
  "node_modules/primeng/resources/themes/nova-light/theme.css",
  "node_modules/primeng/resources/primeng.min.css",
  //...
],
primeng github
Github helps you to download the all libraries fo PrimeNG. Go on Github.
PrimeNG Datatable
The PrimeNG data table helps you to present the data in tables. Because every application needs to present the data in table form primeng helps you to present the data.
After installing the primeng in your project and import the all module after that we can use the data table as shown in the following example.
PrimeNG Datatable Example
import { Component, OnInit } from '@angular/core';

@Component({
  template: `
    <p-dataTable [value]="transactions">
      <p-column field="date" header="Date"></p-column>
      <p-column field="label" header="Label"></p-column>
      <p-column field="amount" header="Amount"></p-column>
    </p-dataTable>
  `
})
export class DataTableComponent implements OnInit {
  transactions: {
    date: Date,
    label: string,
    amount: number
  }[];

  ngOnInit() {
    this.transactions = [
      {
        date: new Date(2017, 10, 10, 13, 10, 15),
        label: 'Third transaction',
        amount: 130
      },
      {
        date: new Date(2017, 7, 3, 9, 35, 0),
        label: 'Second transaction',
        amount: 130
      },
      {
        date: new Date(2017, 3, 27, 15, 43, 10),
        label: 'First transaction',
        amount: 130
      }
    ];
  }
}
Angular UI Development with PrimeNG
In the following, we are going to add some UI components by using the PrimeNG. After installing the PrimeNG and import the module by running the above code you can easily add all the components as shown in the following.
InputGroup
The input field is used to get information from the users. Like the Name, DOF, Address, etc. Multiple addons are can be used in the same group. As shown in the following.

inputgroupdemo.html
<h3 class="first">Addons</h3>
<div class="ui-g ui-fluid">
    <div class="ui-g-12 ui-md-4">
        <div class="ui-inputgroup">
            <span class="ui-inputgroup-addon"><i class="pi pi-user" style="line-height: 1.25;"></i></span>
            <input type="text" pInputText placeholder="Username">
        </div>
    </div>

    <div class="ui-g-12 ui-md-4">
        <div class="ui-inputgroup">
            <span class="ui-inputgroup-addon">$</span>
            <input type="text" pInputText placeholder="Price">
            <span class="ui-inputgroup-addon">.00</span>
        </div>
    </div>

    <div class="ui-g-12 ui-md-4">
        <div class="ui-inputgroup">
            <span class="ui-inputgroup-addon">www</span>
            <input type="text" pInputText placeholder="Website">
        </div>
    </div>
</div>

<h3>Multiple Addons</h3>
<div class="ui-g">
    <div class="ui-g-12">
        <div class="ui-inputgroup">
            <span class="ui-inputgroup-addon"><i class="pi pi-tags" style="line-height: 1.25;"></i></span>
            <span class="ui-inputgroup-addon"><i class="pi pi-shopping-cart" style="line-height: 1.25;"></i></span>
            <input type="text" pInputText placeholder="Price">
            <span class="ui-inputgroup-addon">$</span>
            <span class="ui-inputgroup-addon">.00</span>
        </div>
    </div>
</div>

<h3>Button Addons</h3>
<div class="ui-g ui-fluid">
    <div class="ui-g-12 ui-md-4">
        <div class="ui-inputgroup">
            <button pButton type="button" label="Search"></button>
            <input type="text" pInputText placeholder="Keyword">
        </div>
    </div>

    <div class="ui-g-12 ui-md-4">
        <div class="ui-inputgroup">
            <input type="text" pInputText placeholder="Keyword">
            <button pButton type="button" icon="pi pi-refresh" class="ui-button-warn"></button>
        </div>
    </div>

    <div class="ui-g-12 ui-md-4">
        <div class="ui-inputgroup">
            <button pButton type="button" icon="pi pi-check" class="ui-button-success"></button>
            <input type="text" pInputText placeholder="Vote">
            <button pButton type="button" icon="pi pi-times" class="ui-button-danger"></button>
        </div>
    </div>
</div>

<h3>Checkbox and RadioButton</h3>
<div class="ui-g ui-fluid">
    <div class="ui-g-12 ui-md-4">
        <div class="ui-inputgroup">
            <span class="ui-inputgroup-addon"><p-checkbox></p-checkbox></span>
            <input type="text" pInputText placeholder="Username">
        </div>
    </div>

    <div class="ui-g-12 ui-md-4">
        <div class="ui-inputgroup">
            <input type="text" pInputText placeholder="Price">
            <span class="ui-inputgroup-addon"><p-radioButton></p-radioButton></span>
        </div>
    </div>

    <div class="ui-g-12 ui-md-4">
        <div class="ui-inputgroup">
            <span class="ui-inputgroup-addon"><p-checkbox></p-checkbox></span>
            <input type="text" pInputText placeholder="Website">
            <span class="ui-inputgroup-addon"><p-radioButton></p-radioButton></span>
        </div>
    </div>
</div>
AutoComplete
Autocomplete is the input field with the suggestion. As shown in the following

import {AutoCompleteModule} from 'primeng/autocomplete';<h3 class="first">Basic</h3>
<p-autoComplete [(ngModel)]="country" [suggestions]="filteredCountriesSingle" (completeMethod)="filterCountrySingle($event)" field="name" [size]="30"
placeholder="Countries" [minLength]="1"></p-autoComplete>
<span style="margin-left:10px">Country: {{country ? country.name||country : 'none'}}</span>
<h3>Advanced</h3>
<p-autoComplete [(ngModel)]="brand" [suggestions]="filteredBrands" (completeMethod)="filterBrands($event)" [size]="30"
[minLength]="1" placeholder="Hint: type 'v' or 'f'" [dropdown]="true">
<ng-template let-brand pTemplate="item">
<div class="ui-helper-clearfix" style="border-bottom:1px solid #D5D5D5">
<img src="assets/showcase/images/demo/car/{{brand}}.png" style="width:32px;display:inline-block;margin:5px 0 2px 5px"/>
<div style="font-size:18px;float:right;margin:10px 10px 0 0">{{brand}}</div>
</div>
</ng-template>
</p-autoComplete>
<span style="margin-left:50px">Brand: {{brand||'none'}}</span>
<h3>Multiple</h3>
<span class="ui-fluid">
<p-autoComplete [(ngModel)]="countries" [suggestions]="filteredCountriesMultiple" (completeMethod)="filterCountryMultiple($event)" styleClass="wid100"
[minLength]="1" placeholder="Countries" field="name" [multiple]="true">
</p-autoComplete>
</span>
<ul>
<li *ngFor="let c of countries">{{c.name}}</li>
</ul>export class AutoCompleteDemo {
country: any;
countries: any[];
filteredCountriesSingle: any[];
filteredCountriesMultiple: any[];
brands: string[] = ['Audi','BMW','Fiat','Ford','Honda','Jaguar','Mercedes','Renault','Volvo','VW'];
filteredBrands: any[];
brand: string;
constructor(private countryService: CountryService) { }
filterCountrySingle(event) {
let query = event.query;
this.countryService.getCountries().then(countries => {
this.filteredCountriesSingle = this.filterCountry(query, countries);
});
}
filterCountryMultiple(event) {
let query = event.query;
this.countryService.getCountries().then(countries => {
this.filteredCountriesMultiple = this.filterCountry(query, countries);
});
}
filterCountry(query, countries: any[]):any[] {
//in a real application, make a request to a remote url with the query and return filtered results, for demo we filter at client side
let filtered : any[] = [];
for(let i = 0; i < countries.length; i++) {
let country = countries[i];
if(country.name.toLowerCase().indexOf(query.toLowerCase()) == 0) {
filtered.push(country);
}
}
return filtered;
}
filterBrands(event) {
this.filteredBrands = [];
for(let i = 0; i < this.brands.length; i++) {
let brand = this.brands[i];
if(brand.toLowerCase().indexOf(event.query.toLowerCase()) == 0) {
this.filteredBrands.push(brand);
}
}
}
}@Injectable()
export class CountryService {
constructor(private http: Http) {}
getCountries() {
return this.http.get('showcase/resources/data/countries.json')
.toPromise()
.then(res => <any[]> res.json().data)
.then(data => { return data; });
}
}ColorPicker
Colorpicker is the input that is used to select the color. Colorpicker is the type of input field. Two types of color picker inline and overlay as shown in the following.
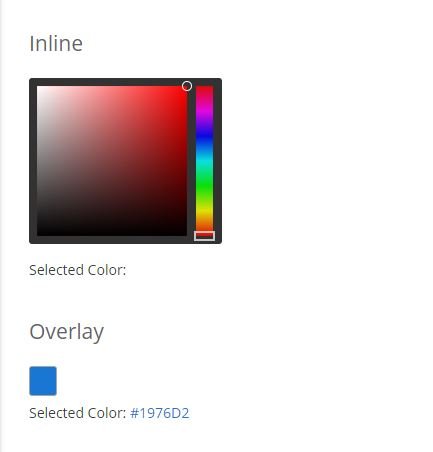
import {ColorPickerModule} from 'primeng/colorpicker';<h3 class="first">Inline</h3>
<p-colorPicker [(ngModel)]="color1" [inline]="true"></p-colorPicker>
<p style="margin-top:.5em">Selected Color: <span style="display:inline-block;width:32px;height:32px;vertical-align:middle" [style.backgroundColor]="color1"></span> {{color1}} </p>
<h3>Overlay</h3>
<p-colorPicker [(ngModel)]="color2"></p-colorPicker>
<p style="margin-top:.5em">Selected Color: <span [ngStyle]="{'color':color2}">{{color2}}</span></p> export class ColorPickerDemo {
color1: string;
color2: string = '#1976D2';
}Editor
The editor is the rich text input field that helps to get the data from in user with styling as showing in the following.
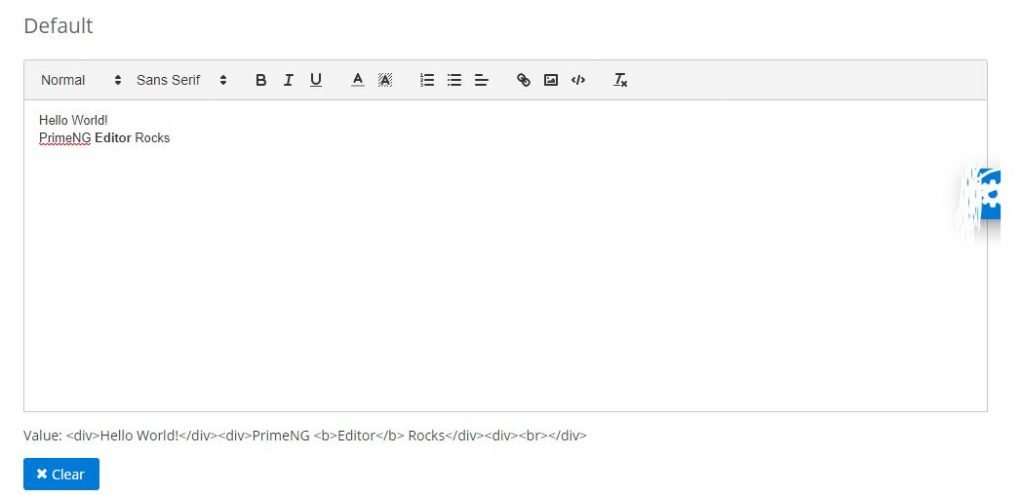
import {EditorModule} from 'primeng/editor';<h3 class="first">Default</h3>
<p-editor [(ngModel)]="text1" [style]="{'height':'320px'}"></p-editor>
<p>Value: {{text1||'empty'}}</p>
<button pButton type="button" label="Clear" icon="pi pi-times" (click)="text1=null"></button>
<hr style="border-top:0px;border-color:#dde3e6">
<h3>Custom Toolbar</h3>
<p-editor [(ngModel)]="text2" [style]="{'height':'320px'}">
<p-header>
<span class="ql-formats">
<button class="ql-bold" aria-label="Bold"></button>
<button class="ql-italic" aria-label="Italic"></button>
<button class="ql-underline" aria-label="Underline"></button>
</span>
</p-header>
</p-editor>
<p>Value: {{text2||'empty'}}</p>
<button pButton type="button" label="Clear" icon="pi pi-times" (click)="text2=null"></button>import {Component} from '@angular/core';
@Component({
templateUrl: './editordemo.html'
})
export class EditorDemo {
text1: string = '<div>Hello World!</div><div>PrimeNG <b>Editor</b> Rocks</div><div><br></div>';
text2: string;
}
Rating
Rating is also a type of input and is the stars’ base selection.
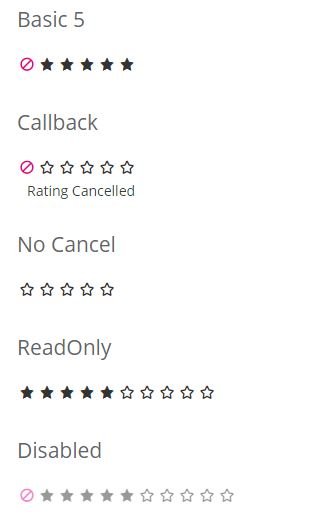
import {RatingModule} from 'primeng/rating';<h3 class="first">Basic {{val1}}</h3>
<p-rating [(ngModel)]="val1"></p-rating>
<h3>Callback {{val2}}</h3>
<p-rating [(ngModel)]="val2" (onRate)="handleRate($event)" (onCancel)="handleCancel($event)"></p-rating> <span *ngIf="msg" style="margin-left:10px">{{msg}}</span>
<h3>No Cancel {{val3}}</h3>
<p-rating [(ngModel)]="val3" [cancel]="false"></p-rating>
<h3>ReadOnly</h3>
<p-rating [ngModel]="5" readonly="true" stars="10" [cancel]="false"></p-rating>
<h3>Disabled</h3>
<p-rating [ngModel]="val4" disabled="true" stars="10"></p-rating>
<h3>Custom Icons</h3>
<p-rating [ngModel]="val5" iconOnClass="pi pi-circle-on" iconOffClass="pi pi-circle-off" iconCancelClass="pi pi-times">;</p-rating>export class RatingDemo {
val1: number;
val2: number = 5;
val3: number;
val4: number = 5;
val5: number;
msg: string;
handleRate(event) {
this.msg = "You have rated " + event.value;
}
handleCancel(event) {
this.msg = "Rating Cancelled";
}
}Slider
The slider is the input filed that is controlled by dragging the handle.

import {SliderModule} from 'primeng/slider';<h3 class="first">Basic: {{val1}}</h3>
<p-slider [(ngModel)]="val1" [style]="{'width':'14em'}"></p-slider>
<h3>Input: {{val2}}</h3>
<input type="text" pInputText [(ngModel)]="val2" style="width:14em"/>
<p-slider [(ngModel)]="val2" [style]="{'width':'14em'}"></p-slider>
<h3>Animate: {{val3}}</h3>
<p-slider [(ngModel)]="val3" [style]="{'width':'14em'}" [animate]="true"></p-slider>
<h3>Step: {{val4}}</h3>
<p-slider [(ngModel)]="val4" [style]="{'width':'14em'}" [step]="20"></p-slider>
<h3>Range: {{rangeValues[0] + ' - ' + rangeValues[1]}}</h3>
<p-slider [(ngModel)]="rangeValues" [style]="{'width':'14em'}" [range]="true"></p-slider>
<h3>Vertical: {{val5}}</h3>
<p-slider [(ngModel)]="val5" [style]="{'height':'14em'}" orientation="vertical"></p-slider>export class SliderDemo {
val1: number;
val2: number = 50;
val3: number;
val4: number;
val5: number;
rangeValues: number[] = [20,80];
}SelectButton
The select button is used to select the single or multiple items from the button listing as shown in the following.

import {SelectButtonModule} from 'primeng/selectbutton';<h3 class="first">Single</h3>
<p-selectButton [options]="types" [(ngModel)]="selectedType"></p-selectButton>
<p>Selected Type: <span style="font-weight: bold">{{selectedType}}</span></p>
<h3>Multiple</h3>
<p-selectButton [options]="types" [(ngModel)]="selectedTypes" multiple="multiple"></p-selectButton>
<p>Selected Types: <span style="font-weight: bold" *ngFor="let type of selectedTypes">{{type}} </span></p>
<h3>Icon Only</h3>
<p-selectButton [options]="modes" [(ngModel)]="selectedModes" multiple="multiple"></p-selectButton>
<p>Selected Modes: <span style="font-weight: bold" *ngFor="let mode of selectedModes">{{mode}} </span></p>
<h3>Custom Template</h3>
<p-selectButton [options]="countries" [(ngModel)]="selectedCountry" optionLabel="name">
<ng-template let-item>
<div style="padding: .5em 1em">
<img style="vertical-align: middle; margin-right: .5em" src="assets/showcase/images/demo/flag/{{item.value.flag}}" height="20px"/>
<span>{{item.name}}</span>
</div>
</ng-template>
</p-selectButton>
<p>Selected Country: <span style="font-weight: bold">{{selectedCountry?.name}}</span></p>
<hr>
<button type="button" (click)="clear()" pButton icon="pi pi-times" label="Clear"></button>export class SelectButtonDemo {
types: SelectItem[];
selectedType: string;
selectedTypes: string[] = ['PayPal','MasterCard'];
selectedModes: string[];
modes: SelectItem[];
countries: any[];
selectedCountry: any;
constructor() {
this.types = [
{label: 'Paypal', value: 'PayPal', icon: 'fa fa-fw fa-cc-paypal'},
{label: 'Visa', value: 'Visa', icon: 'fa fa-fw fa-cc-visa'},
{label: 'MasterCard', value: 'MasterCard', icon: 'fa fa-fw fa-cc-mastercard'}
];
this.modes = [
{value: 'Bold', title: 'Bold', icon: 'fa fa-fw fa-bold'},
{value: 'Italic', title: 'Italic', icon: 'fa fa-fw fa-italic'},
{value: 'Underline', title: 'Underline', icon: 'fa fa-fw fa-underline'}
];
this.countries = [
{name: 'USA', flag: 'usa.png'},
{name: 'Germany', flag: 'germany.png'},
{name: 'Japan', flag: 'japan.png'}
];
}
clear() {
this.selectedType = null;
this.selectedTypes = [];
this.selectedModes = [];
this.selectedCountry = null;
}
}ToggleButton
The toggle button is the type of input filed that is used to get the boolean value as showing the following.
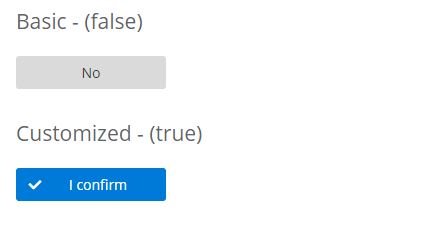
import {ToggleButtonModule} from 'primeng/togglebutton';<h3 class="first">Basic - ({{checked1}})</h3>
<p-toggleButton [(ngModel)]="checked1" [style]="{'width':'150px'}"></p-toggleButton>
<h3>Customized - ({{checked2}})</h3>
<p-toggleButton [(ngModel)]="checked2" onLabel="I confirm" offLabel="I reject" onIcon="pi pi-check" offIcon="pi pi-times" [style]="{'width':'150px'}"></p-toggleButton>export class ToggleButtonDemo {
checked1: boolean = false;
checked2: boolean = true;
}Button
The button is the basic element of any application.

import {ButtonModule} from 'primeng/button';<h3 class="first">Button Component</h3>
<p-button label="Click"></p-button>
<p-button icon="pi pi-check" label="Click"></p-button>
<p-button icon="pi pi-check" iconPos="right" label="Click"></p-button>
<p-button icon="pi pi-check"></p-button>
<p-button icon="pi pi-check" [disabled]="true" label="Disabled"></p-button>
<h3>Button Directive</h3>
<button pButton type="button"label="Click"></button>
<button pButton type="button" icon="pi pi-check" label="Click"></button>
<button pButton type="button" icon="pi pi-check" iconPos="right" label="Click"></button>
<button pButton type="button" icon="pi pi-check"></button>
<button pButton type="button" icon="pi pi-check" [disabled]="true" label="Disabled"></button>
<h3>Severity Buttons</h3>
<button pButton type="button" label="Primary"></button>
<button pButton type="button" label="Secondary" class="ui-button-secondary"></button>
<button pButton type="button" label="Success" class="ui-button-success"></button>
<button pButton type="button" label="Info" class="ui-button-info"></button>
<button pButton type="button" label="Warning" class="ui-button-warning"></button>
<button pButton type="button" label="Danger" class="ui-button-danger"></button>
<h3>Raised Buttons</h3>
<button pButton type="button" label="Primary" class="ui-button-raised"></button>
<button pButton type="button" label="Secondary" class="ui-button-raised ui-button-secondary"></button>
<button pButton type="button" label="Success" class="ui-button-raised ui-button-success"></button>
<button pButton type="button" label="Info" class="ui-button-raised ui-button-info"></button>
<button pButton type="button" label="Warning" class="ui-button-raised ui-button-warning"></button>
<button pButton type="button" label="Danger" class="ui-button-raised ui-button-danger"></button>
<h3>Rounded Buttons</h3>
<button pButton type="button" label="Primary" class="ui-button-rounded"></button>
<button pButton type="button" label="Secondary" class="ui-button-rounded ui-button-secondary"></button>
<button pButton type="button" label="Success" class="ui-button-rounded ui-button-success"></button>
<button pButton type="button" label="Info" class="ui-button-rounded ui-button-info"></button>
<button pButton type="button" label="Warning" class="ui-button-rounded ui-button-warning"></button>
<button pButton type="button" label="Danger" class="ui-button-rounded ui-button-danger"></button>export class ButtonDemo {
clicks: number = 0;
count() {
this.clicks++;
}
}Carousel
Carousel is the content slider that is presenting the data in slide form as shown in the following.

import {CarouselModule} from 'primeng/carousel';<p-carousel [value]="cars" [numVisible]="4" [numScroll]="3" [circular]="false" [responsiveOptions]="responsiveOptions">
<p-header>
<h3>Basic</h3>
</p-header>
<ng-template let-car pTemplate="item">
<div class="car-details">
<div class="p-grid p-nogutter">
<div class="p-col-12">
<img src="assets/showcase/images/demo/car/{{car.brand}}.png" />
</div>
<div class="p-col-12 car-data">
<div class="car-title">{{car.brand}}</div>
<div class="car-subtitle">{{car.year}} | {{car.color}}</div>
<div class="car-buttons">
<button pButton type="button" class="ui-button-secondary" icon="pi pi-search"></button>
<button pButton type="button" class="ui-button-secondary" icon="pi pi-star"></button>
<button pButton type="button" class="ui-button-secondary" icon="pi pi-cog"></button>
</div>
</div>
</div>
</div>
</ng-template>
</p-carousel>
<p-carousel [value]="cars" styleClass="custom-carousel" [numVisible]="3" [numScroll]="1" [circular]="true" [autoplayInterval]="3000" [responsiveOptions]="responsiveOptions">
<p-header>
<h3>Circular, AutoPlay, 3 Items per Page and Scroll by 1</h3>
</p-header>
<ng-template let-car pTemplate="item">
<div class="car-details">
<div class="p-grid p-nogutter">
<div class="p-col-12">
<img src="assets/showcase/images/demo/car/{{car.brand}}.png" />
</div>
<div class="p-col-12 car-data">
<div class="car-title">{{car.brand}}</div>
<div class="car-subtitle">{{car.year}} | {{car.color}}</div>
<div class="car-buttons">
<button pButton type="button" class="ui-button-secondary" icon="pi pi-search"></button>
<button pButton type="button" class="ui-button-secondary" icon="pi pi-star"></button>
<button pButton type="button" class="ui-button-secondary" icon="pi pi-cog"></button>
</div>
</div>
</div>
</div>
</ng-template>
</p-carousel>
<p-carousel [value]="cars" orientation="vertical" [style]="{'max-width':'400px', 'margin-top':'2em'}" verticalViewPortHeight="330px" [numVisible]="1" [numScroll]="1">
<p-header>
<h3>Vertical</h3>
</p-header>
<ng-template let-car pTemplate="item">
<div class="car-details">
<div class="p-grid p-nogutter">
<div class="p-col-12">
<img src="assets/showcase/images/demo/car/{{car.brand}}.png" />
</div>
<div class="p-col-12 car-data">
<div class="car-title">{{car.brand}}</div>
<div class="car-subtitle">{{car.year}} | {{car.color}}</div>
<div class="car-buttons">
<button pButton type="button" class="ui-button-secondary" icon="pi pi-search"></button>
<button pButton type="button" class="ui-button-secondary" icon="pi pi-star"></button>
<button pButton type="button" class="ui-button-secondary" icon="pi pi-cog"></button>
</div>
</div>
</div>
</div>
</ng-template>
</p-carousel>@Component({
templateUrl: './carouseldemo.html',
styles: [`
.carousel-demo .ui-carousel .ui-carousel-content .ui-carousel-item .car-details > .p-grid {
border: 1px solid #b3c2ca;
border-radius: 3px;
margin: 0.3em;
text-align: center;
padding: 2em 0 2.25em 0;
}
.carousel-demo .ui-carousel .ui-carousel-content .ui-carousel-item .car-data .car-title {
font-weight: 700;
font-size: 20px;
margin-top: 24px;
}
.carousel-demo .ui-carousel .ui-carousel-content .ui-carousel-item .car-data .car-subtitle {
margin: 0.25em 0 2em 0;
}
.carousel-demo .ui-carousel .ui-carousel-content .ui-carousel-item .car-data button {
margin-left: 0.5em;
}
.carousel-demo .ui-carousel .ui-carousel-content .ui-carousel-item .car-data button:first-child {
margin-left: 0;
}
.carousel-demo .ui-carousel.custom-carousel .ui-carousel-dot-icon {
width: 16px !important;
height: 16px !important;
border-radius: 50%;
}
.carousel-demo .ui-carousel.ui-carousel-horizontal .ui-carousel-content .ui-carousel-item.ui-carousel-item-start .car-details > .p-grid {
margin-left: 0.6em;
}
.carousel-demo .ui-carousel.ui-carousel-horizontal .ui-carousel-content .ui-carousel-item.ui-carousel-item-end .car-details > .p-grid {
margin-right: 0.6em;
}
`],
encapsulation: ViewEncapsulation.None
})
export class CarouselDemo {
cars: any[];
responsiveOptions;
constructor(private carService: CarService) {
this.responsiveOptions = [
{
breakpoint: '1024px',
numVisible: 3,
numScroll: 3
},
{
breakpoint: '768px',
numVisible: 2,
numScroll: 2
},
{
breakpoint: '560px',
numVisible: 1,
numScroll: 1
}
];
}
ngOnInit() {
this.carService.getCarsSmall().then(cars => {
this.cars = cars
});
}
}Is PrimeNG or angular material better?
PrimeNG is better then angular material because in the primeNG 80+ components that you can use into your angular project. PrimeNG have a lot of compounents. Angular Material is not better then primeng.
Is PrimeNG free for commercial use?
PrimeNG is an open-source library and is available free for commercial use. You can use it freely in any angular project that is licensed under MIT license.
Reference
a lot of more UI component is available on the official site of PrimeNG is primefaces.org. You can read more about components on here: Visit
Visit the angular tutorial list. And make strong your angular concept. click here. wuschools.com is always written about the Agular concept for the angular lover. Ang writes about how angular makes your life easy if you are a web site developer.


